

A:1、 AW20144X_20198X_20216X的open或short检测需要在灯常亮是进行;所以需要点亮所有灯,其流程如下:
1) 使能芯片和当前项目使用的SW通道:
l PAGE0页的0x00寄存器的CHIPEN位设置为1;
l PAGE0页的0x00寄存器的SWSEL根据项目使用的SW设置。
GCR: Global Control Register (Page 0: Address 0x00)
2) 将PAGE1页所有灯珠的PWMx和PAGE2页所有灯珠的SLx都设置为0xff
PWMx (x=0~215): PWM Configure Register (Page 1: Address 0x00~0xD7)
SLx (x=0~215): SL Configure Register (Page 2: Address 0x00~0xD7)
3) 根据项目在PAGE0页的0x01寄存器设置全局电流;推荐设置为0x0f
GCCR: Global Current Control Register (Page 0: Address 0x01)
注意:
Open判断的条件是:CSx引脚上的电压小于VTHopen(PAGE0页0x2B寄存器OTH bit,0为0.1V、1为0.2V);
Short判断的条件是:CSx引脚上的电压大于PVCC-VTHshort(手册的开短路描述VTHshort大小,例如AW20216QNR的VTHshort =0.8V)
SRCR: Open/Short Control Register (Page 0: Address 0x2B)
2、 在PAGE0页的0x00寄存器的OSDE打开open或short检测;
GCR: Global Control Register (Page 0: Address 0x00)
3、 延时100ms;
4、 读PAGE0页的0x03~0x26寄存器查看检测结果,其对应的位置如下:
OSR0~OSR35: Open/Short Status Register (Page 0: Address 0x03~0x26)
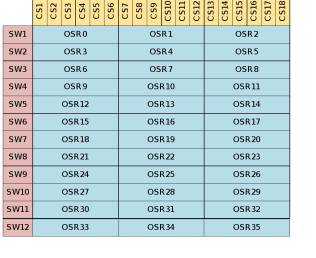
5、 注意:需要先检测short,将其对应灯珠修改后再进行open检测
6、 用AW20216QNR举例如下:
1、 //1.点亮所有灯
2、 // Chip enable and open SW1-SW11
3、 aw_i2c_writebyte(I2C_ADDR, 0xf0, 0xc0);
4、 aw_i2c_writebyte(I2C_ADDR, 0x00, 0xb1);
5、 // Set PWMx
6、 aw_i2c_writebyte(I2C_ADDR, 0xf0, 0xc1);
7、 for(int i = 0;i < NUMS; i++){ //NUMS is the number of LEDs
8、 aw_i2c_writebyte(I2C_ADDR, i,0xff);
9、 }
10、 // Set SLx
11、 aw_i2c_writebyte(I2C_ADDR, 0xf0, 0xc2);
12、 for(int i = 0;i < NUMS; i++){ //NUMS is the number of LEDs
13、 aw_i2c_writebyte(I2C_ADDR, i,0xff);
14、 }
15、 // Set global current
16、 aw_i2c_writebyte(I2C_ADDR, 0xf0, 0xc0);
17、 aw_i2c_writebyte(I2C_ADDR, 0x01, 0x0f); //Need to calculate based on the project
18、
19、 //2.开始short检测
20、 // Set short detection
21、 aw_i2c_readbyte(I2C_ADDR, 0x00, ®_value);
22、 reg_value &= AW20144_BIT_CHIPEN_DIS; //AW20144_BIT_CHIPEN_DIS = (~(1<<0))
23、 reg_value |= AW20144_BIT_SHORT_EN; //AW20144_BIT_SHORT_EN (0x5)
24、 aw_i2c_writebyte(I2C_ADDR, 0x00, reg_value);
25、 soft_delay(100); //100ms
26、 for(int i = 0x03;i < 0x26; i++){
27、 aw_i2c_readbyte(I2C_ADDR, i, short_result); //short_result值就是咱们short检测结果,按照手册描述查找对应位置
28、 }
29、 //3.修好short位置
30、 //4.开始open检测
31、 // Set VTHopen
32、 aw_i2c_writebyte(I2C_ADDR, 0x29, 0x20);
33、 aw_i2c_writebyte(I2C_ADDR, 0x2B, 0x22); //0x02 OTH=0 VTHopen=0.1V,0x22 OTH=1 VTHopen=0.2V,
34、 // Set open detection
35、 aw_i2c_readbyte(I2C_ADDR, 0x00, ®_value);
36、 reg_value &= AW20144_BIT_CHIPEN_DIS; //AW20144_BIT_CHIPEN_DIS = (~(1<<0))
37、 reg_value |= AW20144_BIT_OPEN_EN; //AW20144_BIT_OPEN_EN (0x7)
38、 aw_i2c_writebyte(I2C_ADDR, 0x00, reg_value);
39、 soft_delay(100); //100ms
40、 for(int i = 0x03;i < 0x26; i++){
41、 aw_i2c_readbyte(I2C_ADDR, i, open_result); //open_result值就是咱们open检测结果,按照手册描述查找对应位置
42、 }
43、 aw_i2c_writebyte(I2C_ADDR, 0x29, 0x00);
44、 //5.软件复位并按照项目需求进行初始化
7、 用AW20216SQNR举例如下:
1、 //1.点亮所有灯
2、 // Chip enable and open SW1-SW11
3、 aw_spi_writebyte(CMD_PAGE0, 0x00, 0xb1);
4、 // Set PWMx
5、 for(int i = 0;i < NUMS; i++){ //NUMS is the number of LEDs
6、 aw_spi_writebyte(CMD_PAGE1, i,0xff);
7、 }
8、 // Set SLx
9、 for(int i = 0;i < NUMS; i++){ //NUMS is the number of LEDs
10、 aw_spi_writebyte(CMD_PAGE2, i,0xff);
11、 }
12、 // Set global current
13、 aw_spi_writebyte(CMD_PAGE0, 0x01, 0x0f); //Need to calculate based on the project
14、
15、 //2.开始short检测
16、 // Set short detection
17、 aw_spi_readbyte(CMD_PAGE0, 0x00, ®_value);
18、 reg_value &= AW20144_BIT_CHIPEN_DIS; //AW20144_BIT_CHIPEN_DIS = (~(1<<0))
19、 reg_value |= AW20144_BIT_SHORT_EN; //AW20144_BIT_SHORT_EN (0x5)
20、 aw_spi_writebyte(CMD_PAGE0, 0x00, reg_value);
21、 soft_delay(100); //100ms
22、 for(int i = 0x03;i < 0x26; i++){
23、 aw_spi_writebyte(CMD_PAGE0, i, short_result); //short_result值就是咱们short检测结果,按照手册描述查找对应位置
24、 }
25、 //3.修好short位置
26、 //4.开始open检测
27、 // Set VTHopen
28、 aw_spi_writebyte(CMD_PAGE0, 0x29, 0x20);
29、 aw_spi_writebyte(CMD_PAGE0, 0x2B, 0x22); //0x02 OTH=0 VTHopen=0.1V,0x22 OTH=1 VTHopen=0.2V,
30、 // Set open detection
31、 aw_spi_readbyte(CMD_PAGE0, 0x00, ®_value);
32、 reg_value &= AW20144_BIT_CHIPEN_DIS; //AW20144_BIT_CHIPEN_DIS = (~(1<<0))
33、 reg_value |= AW20144_BIT_OPEN_EN; //AW20144_BIT_OPEN_EN (0x7)
34、 aw_spi_writebyte(CMD_PAGE0, 0x00, reg_value);
35、 soft_delay(100); //100ms
36、 for(int i = 0x03;i < 0x26; i++){
37、 aw_spi_writebyte(CMD_PAGE0, i, open_result); //open_result值就是咱们open检测结果,按照手册描述查找对应位置
38、 }
39、 aw_spi_writebyte(CMD_PAGE0, 0x29, 0x20);
40、 //5.软件复位并按照项目需求进行初始化


沪ICP备10011954号 |

沪公网安备 31011202011955号
